How to Increase Opt-in Subscribers with Gather’s Smart Side Bar
Expand your email list and subscriber base with an attractive, successful, opt-in campaign.
Email campaigns are typically the highest converting channel. It is always a smart move to put every effort into building your email list as early as you can.
Utilising Gather, you can execute a successful opt-in campaign, asking visitors, at the right time, to sign up to your mailing list.
Opt-in campaigns are ideal for those with significant site traffic (think repeat visitors, or content providers) and who are looking to build a email customer base.
Gather gives you the option to run an opt-in campaign through our opt-in side bar. An embedded, editable side bar, complete with your branding that you can show to your visitors at a time determined by you.
In this article we will show you how to design and edit your own Opt-in campaign with Gather.

We will run through the following in setting up your campaign.
Incentivising Sign-ups with Discount Codes
Branding your Campaign
Selecting your Campaign Preferences - FLOATING BUTTON (*NEW)
Selecting your Campaign Preferences - RULES
Selecting your Campaign Preferences - TRIGGERS
Designing your Campaign
Activating and Configuring your Campaign
Incentivising Sign-ups with Discount Codes
Not only does inspiring content and meaningful product incentivise people to sign up to your campaign but an incentive also works wonders in triggering someone to join your campaign.
Here at Gather we give you 3 options:
Providing one discount code to all new subscribers
Providing unique codes to each new subscriber
Offering no reward
To add discount codes to your campaign click on the ‘Discount Codes’ heading in the Gather App. Check the box if you want to include a code in your campaign.
Next, choose the type of code you want to include. If you want to use a single code, insert it in the text box as shown.
(Don’t forget, you will need to generate this code in your Shopify store back-end so that the customer can use the code at the checkout. )

How to add a single discount code

How to add multiple, unique codes.
2. Branding your Campaign
Gather’s embedded opt-in side bar allows you to integrate your campaign seamlessly using your own branding.
To insert your branding images in your campaign navigate to the Editor, ‘Your Website' and select the branding tab.
The images will be displayed as a banner, for best results, use a landscape image with a width of 1000 pixels and height of 400 pixels.

Select the image you want to include by clicking on the ‘choose file’ button then click on upload.
You can select a image for the opt-in form page (page 1) and the opt-in success page (page 2). To add an image to page 2, just follow the same instructions as above.
Once you have uploaded your branding, it is best to test it on your site by activating your campaign on your site (see below). This will ensure that all text is correctly displayed and allow you to make any changes.
3. Selecting your Campaign Preferences - FLOATING BUTTON
Staying in the Editor section in ‘Your Website’ you can now choose to display a ‘floating’ opt-in button on your website. When pressed this button will open the smart opt-in side bar.

Under the preferences section you can choose to show or hide the button. If you show the button on your site, it will follow the rules that you set under step 4 below. For example you can limit the button to a certain page e.g. the cart page.
In addition you can choose whether to display the button on the left or right hand side of the page or along the bottom of the page as a banner.

Gather allows you to change the text on the button and the button colour. By default it will display ‘Opt In’ in white text on a black background. To customise the button head to the Design section of the Editor section.

Under the design you can preview the button under ‘launch button’ tailoring the text and colour to match your website.


You can also add a ‘close’ icon next to the launch button which will enable a user to hide the launch the button on your site. This can be particularly helpful on mobile where the screen size is smaller. You can enable and disable the ‘close button’ and also set the background colour and icon colour of the button.

Don’t forget to save changes you make to the preferences and design.
4. Selecting your Campaign Preferences - RULES
Staying in the Editor section in ‘Your Website’ you can now tell Gather where and when you want the side bar and/or the floating button to open on your website. (Please note, the CART ITEMS and CART VALUE rules do not apply to the floating button.)
Under the preferences heading you have the option to open the side bar from either the right or left hand side.

Use the drop down menu to make your selection.
Targeting rules determine where you want Gather to display the side bar and/or floating button on your website. (If you want the side bar to be displayed on all pages of your site, then move onto the Triggers section, you do not need to set a rule.)
Firstly, choose the rule from the drop down menu.
Gather lets you choose from 4 different rules:
‘Referrer’ means a site such as Google;
‘Page’ relates to a certain page on your site;
‘Cart Item Count’ refers to when there is a certain number of items in the cart;
‘Cart Value refers’ to when the cart exceeds a certain value.
Secondly, set the rule condition from the drop down menu.
Gather lets you choose from 2 types of condition;
‘Is’ / ‘is not’ - If you want your campaign to appear on a specific page of your site then use the rule "is".
‘includes’ / ‘does not include’ - If you want the side bar to appear on a range of pages, which include a certain word, then choose the option "includes".
Lastly, choose the value you want to apply the rule to. For example, if you want to side bar to appear when there are 2 items in the cart, then you would insert the value ‘2’.
In the example below, we have set the rule so that the side bar appears when the customer lands on the order confirmation page, where the URL includes thank_you.
If you are using IS or IS NOT then include here the specific URL where you want the popup to appear, or not appear.
If you are using INCLUDES or DOES NOT INCLUDE, then insert the word or value you want to include/not include, and the popup will appear on any page where the URL includes or excludes that value.
Gather allows you to set up two targeting rules for your campaign. To add an additional rule click on the plus button at the bottom of the Targeting Rules section. If you include two rules, both rules must be satisfied for the popup to appear.
To remove a rule, click on the remove rule button, Gather will confirm with you if you want to discard the rule.

Always remember to click on Save Triggers Rules before navigating away from this section.
5. Selecting your Campaign Preferences - TRIGGERS
The triggers refer to the action performed by a customer that result in the campaign appearing on their screen.
A campaign does not have to include any rules, however, for a side bar to be displayed on your site you must include at least 1 trigger.
The first option you can choose is to show the campaign on exit intent. This means when the customer performs an action, such as moving their mouse to the top left/right hand corner of the page, which suggests they may be about to leave your site the popup will appear on the screen. Using the drop-down menu on the right you can choose how sensitive Gather will be in displaying the popup.
Secondly you can choose to have the campaign open when the customer stays on your target page for a certain period of time. You can set the time, in seconds, using the drop down menu on the right.
Thirdly, you can choose to have the campaign appear anywhere on your site after a set period of time. Again, you can set the time, in seconds, on the right hand side drop down menu.

New! Mobile Sidebar Triggers
To enhance the mobile experience, Gather now includes intelligent sidebar triggers that activate based on user behaviour:
Dynamic Upward Scroll Trigger: When a visitor on a mobile website scrolls vertically upwards with a defined speed, the sidebar will be displayed. This speed threshold is configurable within the Gather Rails application, allowing for precise control over when the sidebar appears based on user navigation patterns.
Viewport Re-entry Trigger: If a mobile visitor leaves the active viewport where the Gather widget is embedded and subsequently returns to that view, the sidebar will be triggered. This ensures that the call-to-action remains accessible when the user's focus returns to the relevant content.
These triggers are designed to be responsive and non-intrusive, improving engagement on mobile devices.

To prevent customers being shown your campaign too regularly, Gather asks you to determine the time period between the popup being shown to the same customer.
Finally, Gather gives you 2 options of what you would like your customer to see upon submitting their details.
Return a message/discount code
In most instances you will want your customer to be given their discount code for opting in to your campaign. In this case simply select ‘Returns message’ from the drop down menu as shown below.

Your customer will receive an email with their code and they will also be provided with their code upon submitting their details, incentivising them to start spending.

2. Redirect to URL
Alternatively, if you have multiple campaigns running, with Gather, you can choose to redirect new signups to your referral campaign.
In this instance you can select ‘Redirect to URL’ from the drop down menu. Now you are be able to enter the URL you wish to send them to in the URL box.
Where you want your referral campaign side bar to open add:
/?gri=open
to the end of the page URL.
To make it easier for your customer to sign up for your referral campaign, you can automatically insert the name and email by appending the following merge tags to the end of the URL:
&name={{LEAD_FIRST_NAME}}&email={{LEAD_EMAIL}}
See below for a full example.


This is an example of the referral campaign dashboard which your customer will be shown to enable them to start making referrals.
They will also receive, by email, their discount code or confirmation of sign up.

Always remember to save your changes before navigating away from the page.
6. Designing your Campaign
The next steps is to confirm the design and content of your opt-in side bar.
Gather allows you to personalise the theme, text and data collected in the side bar by clicking on the side arrows.

Theme relates to the colours and themes used in the side bar. You can customise the pop-up to match your own site branding. The preview pane allows you to see what your design changes will look like on your site.

In addition, under ‘Theme’ you can:

Include an Underlay: This is a layer that covers a webpage so that the opt-in UI is in focus.

Choose to show or hide the Navigation bar and the position of the close button (i.e. in the navigation bar or in the container box.

Choose the colour of your form’s container box, this can be any colour, or, transparent.
Choose how you want the user to close the sidebar.
Either by clicking on the ‘X’ (default") or by clicking on
the ‘X’ OR clicking away from the sidebar.

Choose the form input style to be applied to the ‘name’, ‘email’ and ‘select boxes’.
You can choose if you want to include a banner image in your sidebar pop-up. You make your selection under the ‘Opt-in Banner Image’ menu. By default, the card with overlap the banner image (by approx 1/3 of the image). An overlap allows for a more compact design and reduces the requirement to scroll on the page. You can also select the show the image at full height if this is preferred.

An example of a banner image selected at full height.
Next you can change the content of the opt-in form by clicking on the Opt-in Form. In addition to collecting names and email addresses, you can also collect phone numbers and select data.

If you wish to collect select data about your subscriber, for example, you might ask subscribers which products they are particularly interested in, the information will be stored with lead’s data and exported to Klaviyo and/or MailChimp so you can send out targeted information based on the properties they select.

The following is an example of how the select data will be displayed.

You will be able to see the data input under ‘leads’:

When you account is integrated with Klaviyo or MailChimp the information will be synced so that you can use the data to send targeted information to your subscribers. The data will be stored under custom properties.

In addition, as part of the Opt-in form editor under ‘closing button’ you can select whether to include a close button on the form that closes the card only or the card and container.

Lastly, you can edit the opt-in success wording, shown to the customer when they submit the required details.

You may want to include an autoresponder email for your new subscribers. To set up your email, head to the ‘auto responder email’ tab in the editor section.
*You can now utilise the updated email editor to design the content of your autoresponder email.

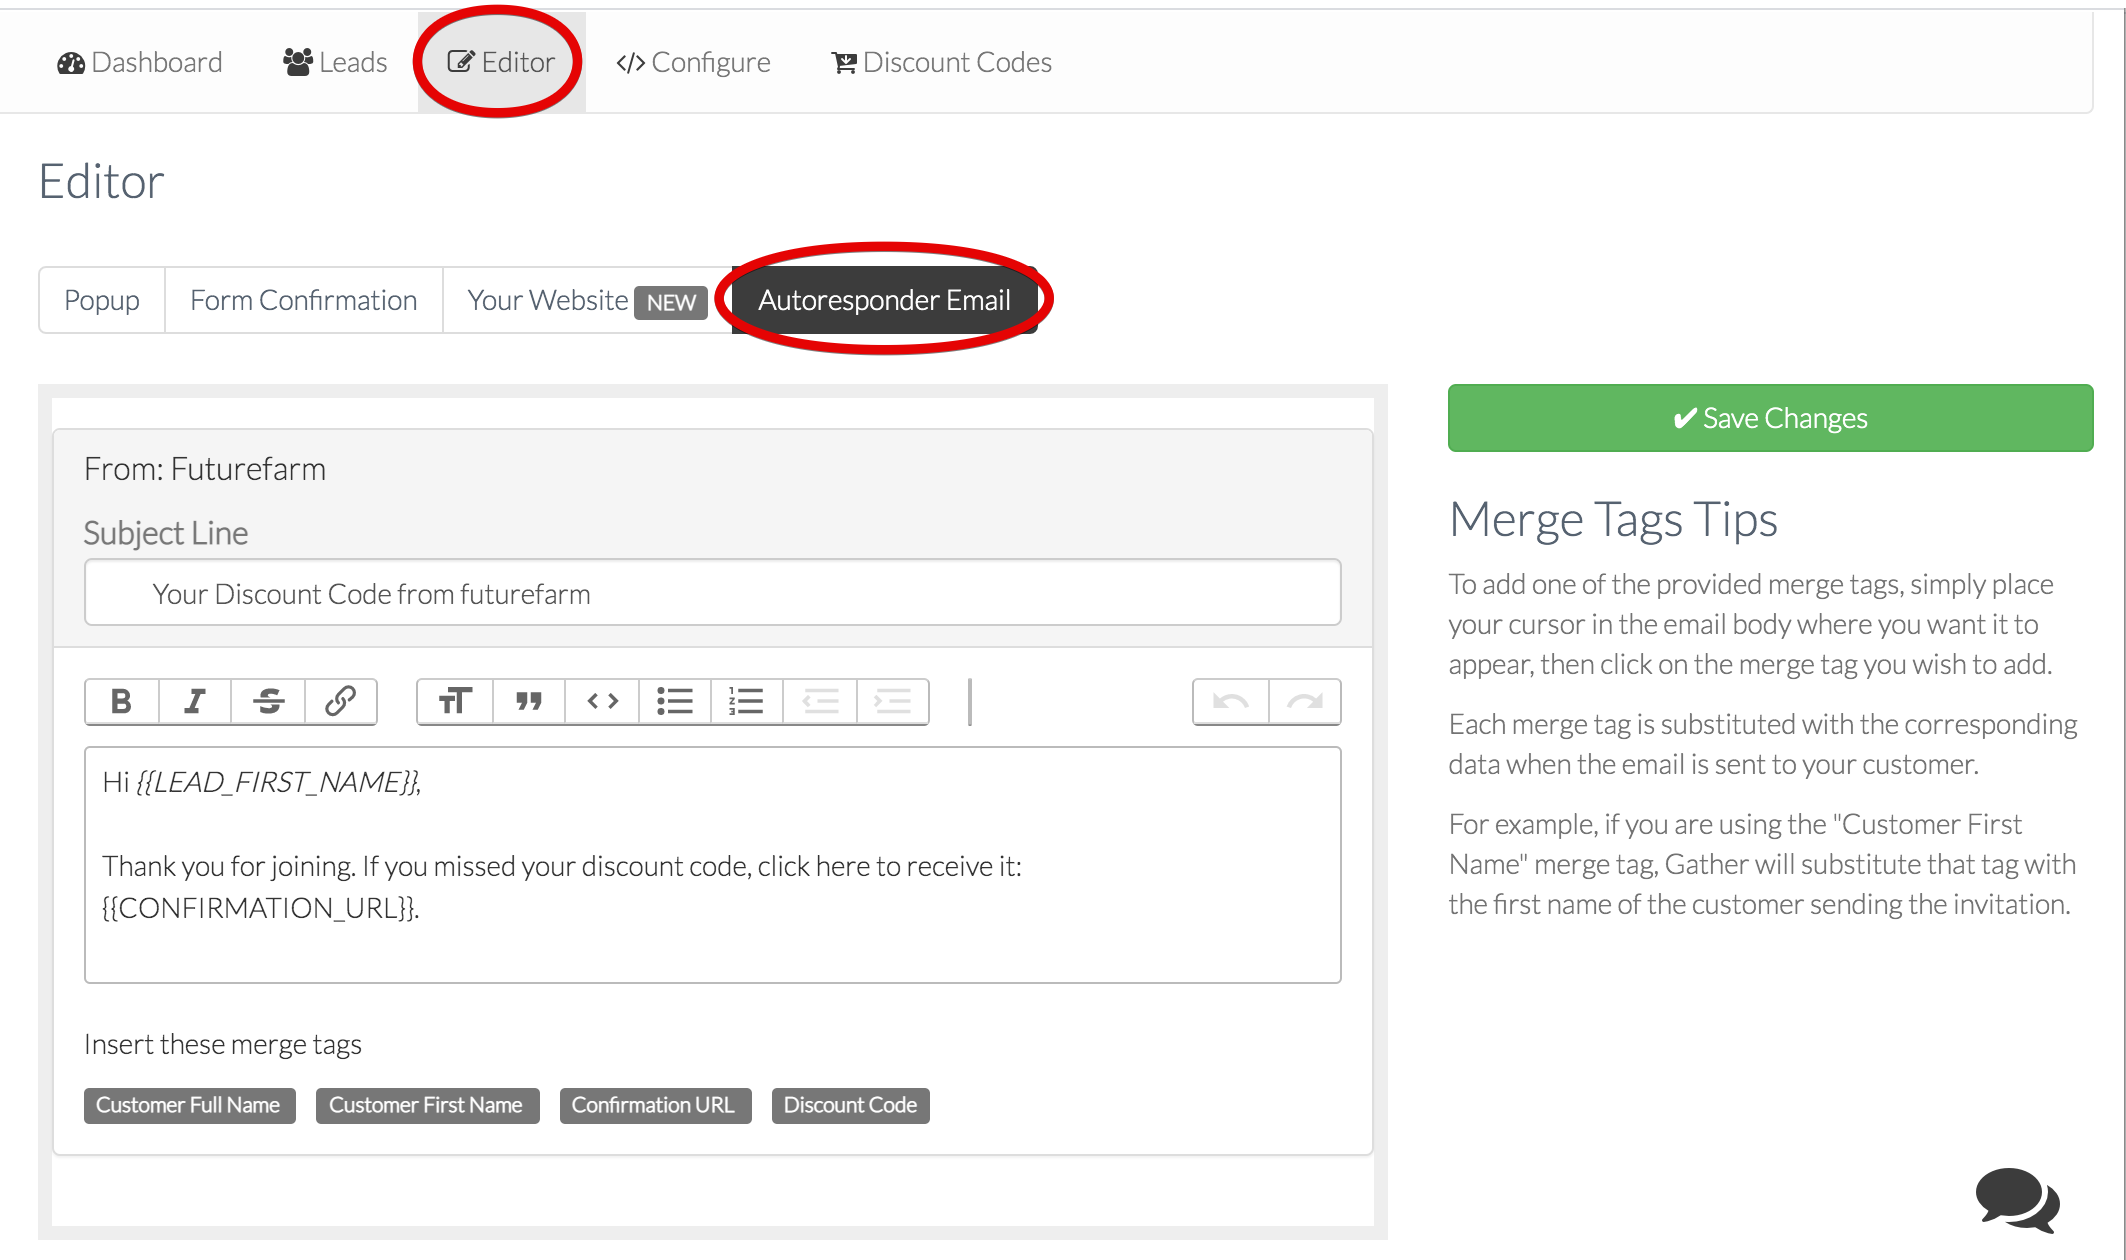
This is an example of our classic email editor. We recommend that you switch to the new editor for a fully customisable email experience.
7. Activating and Configuring your Campaign
Now you are ready to activate your opt-in campaign and side bar on your site! Head over the Configure page to enable your integrations.
If you use Shopify or MailChimp or Klaviyo, you can synchronise your accounts here. You can also enable the autoresponder email here too.
Once this is set up, click on the ‘on/off’ switch in the top left hand corner of your account page to turn on your campaign (you can use this to turn off your campaign).


Now you are ready to go and start collecting new leads! We always recommend that you view your new side bar on your site to ensure that all branding is correctly displayed.
Got any questions? Check out the help articles here at academy, or contact us at hello@gathercustomers.com.