Editing Your Referral Campaign Pop-Up; Using Your Own Banner
In this article we show you how to create a pop-up, using your own themed banner, that is displayed on your website.
*Gather now gives you the opportunity to use a smart sidebar on your website to display your pop-up. To use the sidebar, follow this link: Use Gather’s Smart Sidebar to display your pop-up.
Directing brand advocates into your sales funnel requires touch points and triggers.
A useful trigger, when displayed at the right time and place, is a pop-up on your website which ask your customers to refer a friend.
In this article we show you how to create a branded pop-up, using Gather, to accompany your referral campaign.
In this article you will learn how to:
Set your pop-up targeting rules
Determine the triggers of your pop-up
Set the theme of your pop-up
Edit the overlay box design
Edit the pop-up text
Edit the form of the pop-up
To navigate your way to the pop-up editor, select the campaign you want to edit on the left hand side, click on Editor tab along the top of the page and click on the pop-up header within the editor page. Here we are editing the pop-up for the Multi-tiered referral campaign program.

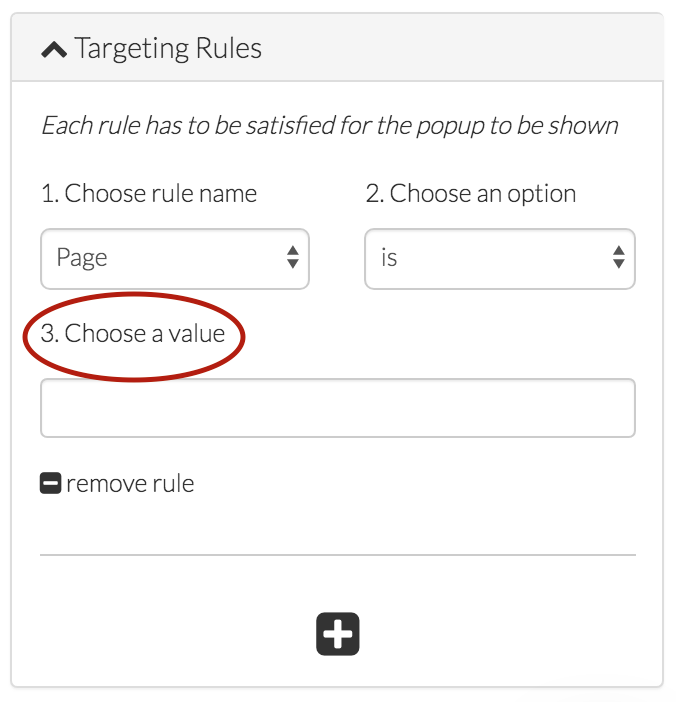
1. Set up your Pop-up targeting rules
Firstly we determine where we want our pop-up to appear on our site. We do this in the targeting rules section. Click on the down arrow next to the heading 'Targeting Rules' on the right hand side of the Editor page.

Firstly, choose the rule name from the drop down menu. "Referrer" means a site such as Google and "Page" relates to a certain page on your site. In most cases, for a pop-up referral campaign, the rule name will likely be set to "Page".

Secondly, you select your rule option. Again, you choose from the drop down menu. If you want your pop-up to appear on a specific page of your site then use the rule "is". Alternatively, if you want the pop-up to appear on a range of pages, which include a certain word, then choose the option "includes".

Finally, you select the value for your rule.
If you are using IS or IS NOT then include here the specific URL where you want the pop-up to appear/not appear.
If you are using INCLUDES or DOES NOT INCLUDE, then insert the word or value you want to include/not include, and the pop-up will appear on any page where the URL includes or excludes that value.
Gather allows you to set up two targeting rules for your campaign. To add an additional rule click on the plus button at the bottom of the Targeting Rules section. If you include two rules, both rules must be satisfied for the pop-up to appear.
To remove a rule, click on the remove rule button, Gather will confirm with you if you want to discard the rule.

Remember to click on "save and view changes" to save your rules.

2. Determine the triggers of your pop-up
The triggers refer to the action performed by a customer that results in the pop-up appearing on their screen. Gather gives you three options to choose from when setting the triggers.

The first option you can choose is to show the pop-up on exit intent. This means when the customer performs an action, such as moving their mouse to the top left/right hand corner of the page, which suggests they may be about to leave your site, the pop-up will appear on the screen. Using the drop-down menu on the right you can choose how sensitive Gather will be in displaying the pop-up.
Secondly you can choose to have the pop-up appear when the customer stays on your target page for a certain period of time. You can set the time, in seconds, using the drop down menu on the right.
Thirdly, you can choose to have the pop-up appear anywhere on your site after a set period of time. Again, you can set the time, in seconds, on the right hand side drop down menu.
To prevent customers being shown the pop-up too regularly, Gather asks you to determine the time period between the pop-up being shown to the same customer.
Remember to click on the green SAVE AND VIEW CHANGES button to save your triggers.

3. Set the theme of your pop-up
The theme refers to the background design of your pop-up. You can use your own site theme or you can use the default Gather theme, which is on a plain background. You are still able to edit the colours, background and the text if you select this option.
The following is for those who wish to use their own banner in the pop-up. Please refer to the following article if you prefer to use the "Link Plain Centered" theme.
When you elect to use your own banner for your pop-up you will prompted to upload an image in the next section. When using your own image please remember to leave space at the bottom of your image to allow room for the sign up form.
The following is an example theme that Gather displays when you choose to use your own banner.

4. Edit the overlay box design
If you have chosen to use your own banner theme you will be asked to chose a file to upload here. Before you upload an image please ensure that the file size is less than 250KB and the height of the image is less than 600 pixels.
Please refer to the following tips when uploading a banner:

Here I have resized my image accordingly for upload:

Once you have chosen your file for upload, click on Save & View changes to see you banner appear in the preview box.
Now that you have successfully uploaded your banner image, Gather allows you to choose the colour of the:
Exit button
Exit font
Background (underlay image can be light or dark)

Once again, remember to click on Save & Preview changes to see any changes you make.
5. Edit the pop-up text
This section allows you to edit the text in your pop-up. It includes a styling tool bar where you can change the size, font and positioning of the text.
Please note that your pop-up will be the same regardless of the reward tier your advocate may be in. So when designing the text it must be something that is relevant to all reward levels.

Remember, to view the changes that you make, to click on the green SAVE AND VIEW CHANGES button.
6. Edit the form of the Pop-up
The form relates to the presentation of the pop-up button. Here you can adjust the following:
Colour of the button
The button text colour
Presentation of the button (raised, flat or square)
The button text

Remember, to view the changes that you make, to click on the green SAVE AND VIEW CHANGES button.
You should now have your own customised pop-up for your campaign.
Got any questions? First head to your Gather account, then click on the Help & Support menu item on the left hand side or check out the help articles here at academy.