Editing the Email invitation sent by you on behalf of your customers
Find out how you can edit and compose your own email template to sent to your customer's friends on their behalf.
*Please note Gather how has a built-in email editor feature available for campaigns where you have selected to send the invitation email on behalf of your advocates. Click here, to find out more about this feature and how to use it.
In this article we show you how, using the Editor tab, to edit the invitation sent by you to your customer's friends. This article is for those campaigns where, in the preferences section, you have selected the invitation mode; 'Sent on behalf of your customer'.

If you selected for your email invitation to be sent by your customer (USE FOR GDPR), please refer to the following article.
The following video runs you through editing the email invitation and previews for you what your Advocate and their friends will see.
Using the Editor tab we will show you how to edit and use the following features of your email invitation:
Upload a Friend Banner Image
Subject line
Body of the email
Merge tags
To navigate to the Editor tab and edit the invitation; first select the campaign you want to edit from the left hand bar. Click on the Editor tab at the top of the page and select 'Email invitation' from within the editor page. Here we are working on the Multi-tiered referral program email sent by us on behalf of our customers.

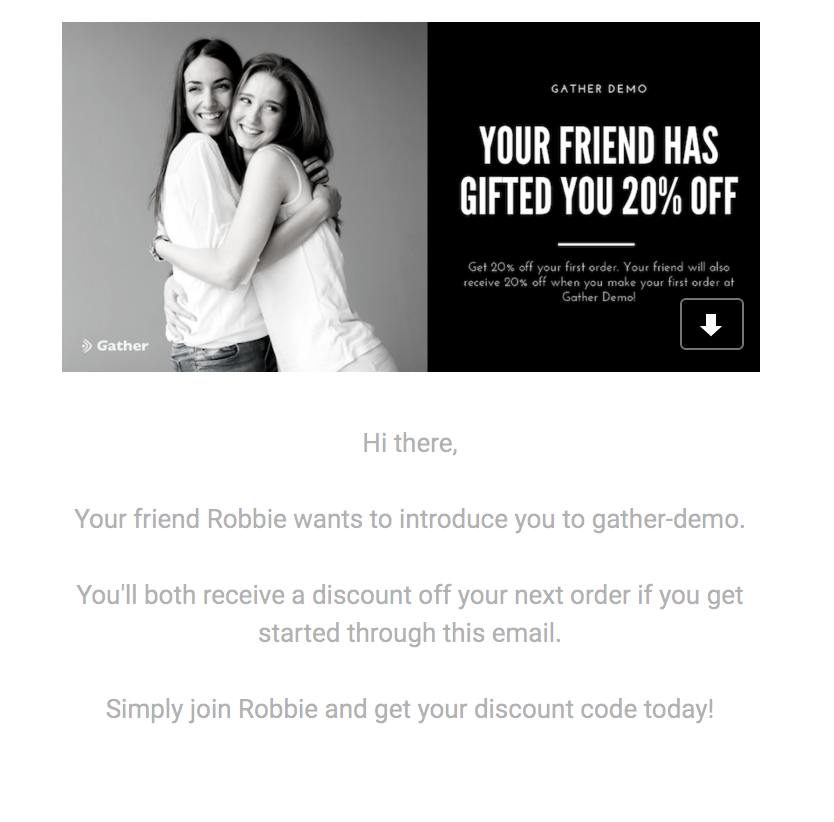
1. Upload a Friend Banner Image
Gather will include, in the email sent to Advocate’s friends, the banner image you have included in your branding section of the campaign. The image used in the email is the image used for the Friend. To find out how to upload a banner image, if you have not already done so, go to the following article.
2. Subject line
The subject line is what your customer's friend will see when the email appears in their browser. To edit the subject line simply click in the subject line box and enter your preferred text.
The default message will read 'CUSTOMER NAME has sent you a Gift'. Gather uses a merge tag to include the name of the customer. In step 3 we learn more about merge tags.

Please note that additional merge tags cannot be inserted in the subject line of an email.
3. Body of email
Gather inserts the following default message in the body of the email for you. You can easily tailor the content of the email by clicking in the box and entering your preferred text.
You can also edit the formatting of the message using the tool bar included along the top of the message.

When you Advocate sends the email to their friends, they are given the option to include a personal message with the email.
4. Merge tags
Gather uses merge tags to make your email invitations more personal. The default email includes your account name and your customer's name.
You also have the option of including the following 2 merge tags;
Customer full name
Customer first name
The process for inserting merge tags is simple. Click in the body of the message where you would like to insert a tag and then click on the tag you would like to insert.
Here I have added the tag ' Customer first name' to the body of the email to personalise the message further.

Please read the Merge tag tips, on the right of the editor page, for further information.

Now your email is ready to send, but before you navigate away from the page, please remember to save your changes by clicking on the green button.

Here is a quick preview example of the email your advocate’s friend will receive using our example above.
Got any questions? First head to your Gather account, then click on the Help & Support menu item on the left hand side or check out the help articles here at academy.